
다형성(polymorphism)
- 의미: 외부에서 보았을 땐 하나이나, 외부의 상황에 따라 여러 가지 형태를 가질 수 있는 능력
- 기능: 하나의 참조변수로 여러 타입의 객체를 참조할 수 있는 것. 조상타입의 참조변수로 자손타입의 객체를 다룰 수 있는 것이 다형성
- 예시: 오버로딩, 레퍼런스 형변환
규칙
부모의 레퍼런스는 자식의 인스턴스를 가리킬 수 있다. 역은 성립하지 않는다.
이유: 부모 클래스와 자식 클래스가 있을 때, 개념적으로 부모 클래스가 더 크기 때문
참조변수의 형변환
- 서로 상속관계에 있는 타입간의 형변환만 가능
- 자손 타입에서 조상타입으로 형변환하는 경우, 형변환 생략가능
자손타입 → 조상타입(Up-casting) : 형변환 생략가능 / 언제나 가능
자손타입 ← 조상타입(Down-casting) : 형변환 생략 불가 / 성공할수도, 실패할수도 있음
다형성 예제 1
Car(parent)
package chap07;

public class Car {

    String color;
    int door;

    void drive() {
        System.out.println("자동차가 갑니다.");
    }

    void stop() {
        System.out.println("자동차가 멈춥니다.");
    }
}
FireEngine(child)
package chap07;

public class FireEngine extends Car {

    void drive() {
        System.out.println("소방차가 갑니다.");
    }

    void stop() {
        System.out.println("소방차가 멈춥니다.");
    }

    void water() {
        System.out.println("물을 뿌립니다.");
    }
}
Ambulance(child)
package chap07;

public class Ambulance extends Car {

    void drive() {
        System.out.println("구급차가 갑니다.");
    }

    void stop() {
        System.out.println("구급차가 멈춥니다.");
    }

    void siren() {
        System.out.println("사이렌을 울립니다.");
    }
}
실행코드
package chap07;

public class Ex11 {
    public static void main(String[] args) {
        Car myCar = new Car();
        FireEngine fire = new FireEngine();
        Ambulance ambulance = new Ambulance();

        myCar.drive();

        myCar = fire;
        myCar.drive();

        myCar = ambulance;
        myCar.drive();
    }
}
package chap07;

public class Ex12 {
    public static void main(String[] args) {
        Car[] cars = new Car[3];
        cars[0] = new Car(); // 첫번째 레퍼런스
        cars[1] = new FireEngine(); // 두번째 레퍼런스
        cars[2] = new Ambulance(); // 세번째 레퍼런스

        for (Car myCar : cars) {
            myCar.drive();
        }
    }
}
레퍼런스 배열(참조변수 배열)
- 배열의 번지수에 Car 클래스에 속한 인스턴스의 주소값을 저장 Car 배열을 생성하여 각각의 번지에 3가지 레퍼런스의 주소값을 저장하고 enhanced for문을 사용하여 출력할 수 있다.
- 부모 클래스 타입의 레퍼런스는 자식 클래스 타입의 인스턴스를 가리킬 수 있다.(참조, 사용 가능)
car[0], car[1], car[2]는 부모 클래스의 레퍼런스, 배열로 만들어서 저장한 것. 배열에는 자식의 인스턴스도 얼마든지 저장 가능
다형성 예제 2
package chap07;

public class Ex13 {

    void driveCar(Car myCar) {
        myCar.drive();
    }

    public static void main(String[] args) {
        Ex13 ex13 = new Ex13();

        Car myCar = new Car();
        FireEngine fire = new FireEngine();
        Ambulance ambulance = new Ambulance();

        ex13.driveCar(myCar);
        ex13.driveCar(fire);
        ex13.driveCar(ambulance);
    }
}
- driveCar의 매개변수는 부모타입인 Car 클래스 타입의 myCar 하나의 메소드로 myCar 대신에 fire, ambulance 넣어서 사용 가능
다운캐스팅
package chap07;

public class Ex14 {
    public static void main(String[] args) {
        Car myCar = new Car();

        try {
            FireEngine fire = (FireEngine)myCar;

            fire.drive();
        } catch (Exception e) {
            e.printStackTrace();
        }

    }
}
java.lang.ClassCastException: chap07.Car cannot be cast to chap07.FireEngine
	at chap07.Ex14.main(Ex14.java:8)
- 생성자는 하나(부모의 생성자) 자식의 레퍼런스에 부모의 레퍼런스 대입 → 컴파일은 가능, runtime에서 오류 발생
- 이유: 컴파일에서는 문법상의 오류만 확인. 문법상으로는 오류가 없으나 자식의 레퍼런스는 부모의 레퍼런스를 가리킬 수 없기 때문에 오류
- 결론: 자식의 레퍼런스는 부모의 레퍼런스를 가리킬 수 없다!
참조변수의 형변환
package chap07;

public class Ex15 {
    public static void main(String[] args) {
        Car myCar = new FireEngine();
        myCar.drive();
        myCar.stop();
//        myCar.water(); // 에러 발생.
    }
}
- 에러 원인: Car 클래스 타입의 myCar는 Car 클래스에 존재하는 멤버는 알지만 Car에 존재하지 않는 멤버는 모른다.
따라서 water는 사용할 수 없다. - 해결 방법
package chap07;

public class Ex15 {
    public static void main(String[] args) {
        Car myCar = new FireEngine();
        myCar.drive();
        myCar.stop();
//        myCar.water(); // 에러 발생.
        FireEngine fire = (FireEngine) myCar;
        fire.water();
    }
}
// 결과
소방차가 갑니다.
소방차가 멈춥니다.
물을 뿌립니다.
- 가능한 이유: myCar는 FireEngine 인스턴스
FireEngine 인스턴스(myCar)를 FireEngine으로 변환해서 FireEngine 레퍼런스(fire)에 넣는 것이기에 가능
instanceof
부모를 상속해서 만들어진 자식 객체가 여러 타입인 경우, 특정 클래스가 맞는지 확인하기 위해 사용
package chap07;

public class Ex16 {
    public static void main(String[] args) {
        Car myCar = new Car();
		FireEngine fire = new FireEngine();
        Ambulance ambulance = new Ambulance();

        System.out.println("my Car isntanceof Car:\\t" + (myCar instanceof Car));
        System.out.println("my Car isntanceof FireEngine:\\t" + (myCar instanceof FireEngine));
	System.out.println("my Car isntanceof Ambulance:\\t" + (myCar instanceof Ambulance));

        System.out.println("fire isntanceof Car:\\t" + (fire instanceof Car));
        System.out.println("fire isntanceof Car:\\t" + (fire instanceof FireEngine));
//        System.out.println("fire isntanceof Car:\\t" + (fire instanceof Ambulance));

	System.out.println("ambulance isntanceof Car:\\t" + (ambulance instanceof Car));
//        System.out.println("ambulance isntanceof Car:\\t" + (ambulance instanceof FireEngine));
        System.out.println("ambulance isntanceof Car:\\t" + (ambulance instanceof Ambulance));
    }
}
my Car isntanceof Car: true
my Car isntanceof FireEngine: false
my Car isntanceof Ambulance: false
fire isntanceof Car: true
fire isntanceof Car: true
ambulance isntanceof Car: true
ambulance isntanceof Car: true
package chap07;

public class Ex17 {
    public static void main(String[] args) {
        Car c1, c2, c3;
        c1 = new Car();
				c2 = new FireEngine();
				c3 = new Ambulance();

        System.out.println("c1 isntanceof Car:\\t" + (c1 instanceof Car));
        System.out.println("c1 isntanceof FireEngine:\\t" + (c1 instanceof FireEngine));
        System.out.println("c1 isntanceof Ambulance:\\t" + (c1 instanceof Ambulance));

        System.out.println("c2 isntanceof Car:\\t" + (c2 instanceof Car));
        System.out.println("c2 isntanceof FireEngine:\\t" + (c2 instanceof FireEngine));
        System.out.println("c2 isntanceof Ambulance:\\t" + (c2 instanceof Ambulance));

        System.out.println("c3 isntanceof Car:\\t" + (c3 instanceof Car));
        System.out.println("c3 isntanceof FireEngine:\\t" + (c3 instanceof FireEngine));
        System.out.println("c3 isntanceof Ambulance:\\t" + (c3 instanceof Ambulance));
    }
}
c1 isntanceof Car:	true
c1 isntanceof FireEngine:	false
c1 isntanceof Ambulance:	false
c2 isntanceof Car:	true
c2 isntanceof FireEngine:	true
c2 isntanceof Ambulance:	false
c3 isntanceof Car:	true
c3 isntanceof FireEngine:	false
c3 isntanceof Ambulance:	true
instanseof 예제
각각이 보유한 기능을 instanceof와 조건문을 활용하여 enhanced for문으로 구현
package chap07;

public class Ex12 {
    public static void main(String[] args) {
        Car[] cars = new Car[3];
        cars[0] = new Car();
        cars[1] = new FireEngine();
        cars[2] = new Ambulance();

        for (Car myCar : cars) {
            myCar.drive();
        }
    }
}
package chap07;

// 소방차이면 물을 뿌리고, 구급차이면 사이렌을 울리는 코드를 작성하세요.

public class Ex18 {
    public static void main(String[] args) {
        Car[] cars = new Car[3];
        cars[0] = new Car();
        cars[1] = new FireEngine();
        cars[2] = new Ambulance();

        for (Car myCar : cars) {
            myCar.drive();
            if (myCar instanceof FireEngine) {
                ((FireEngine) myCar).water();
            } else if (myCar instanceof Ambulance) {
                ((Ambulance) myCar).siren();
            }
            myCar.stop();
        }
    }
}
참조변수와 인스턴스변수의 연결
오버라이딩 : 부모의 메서드를 자식이 상황에 맞게 재정의
같은 이름의 필드를 자식 이름에서 다시 만드는게 의미가 있을까? → 거의 대부분의 경우에 의미가 없고, 실제로 사용하지 않는다.
- 예시
package chap07;

public class Parent3 {
    int num;

    Parent3() {
        num = 1234;
    }

    void methodA() {
        System.out.println("Parent3 methodA()");
    }
}
package chap07;

public class Child3 extends Parent3 {
    int num;

    Child3() {
        num = 5678;
    }

    void methodA() {
        System.out.println("Child3 methodA()");
    }
}
package chap07;

public class Ex19 {
    public static void main(String[] args) {
        Parent3 p1, p2;

        p1 = new Parent3();
        p2 = new Child3();

        System.out.println("p1.num:\\t" + p1.num);
        p1.methodA();

        System.out.println("p2.num:\\t" + p2.num);
        p2.methodA();
    }
}
- 풀이
필드명이 부모와 자식간에 중복될 때 어떤 값이 레퍼런스에 사용됨에 따라 부모의 필드 또는 자식의 필드를 사용할지 결정된다.
num은 부모와 자식에게 모두 있지만 부모의 num을 가져온다.
p2는 Child3인데 p2의 레퍼런스를 통해서 num을 출력하니 자식의 num이 아닌 부모의 num이 출력된다.
필드가 중복될 때 부모의 레퍼런스로 자식의 인스턴스에 동일한 이름의 필드값을 가리키면 자동으로 레퍼런스를 따라간다.
반면에 메서드는 현재 가리키고 있는 인스턴스의 메서드가 나온다.
p1.methodA()는 부모의 methodA(), p2.methodA()는 자식의 methodA()가 나옴. - 결론 정말 특별한 경우가 아니라면 필드의 중복은 사용하지 않는 것을 권장
추상 클래스(abstract class)
추상 메서드(abstract method)
- 의미: 선언부만 있고 구현부(몸통, body)가 없는 메서드. 꼭 필요하지만 자손마다 다르게 구현될 것으로 예상되는 경우에 사용
- 어떤 클래스에 추상 메서드가 하나라도 있다면 그 클래스는 추상 클래스가 된다. 역은 성립하지 않는다.
추상 클래스의 특징
- 추상 클래스는 인스턴스를 생성할 수 없다.
- 추상 클래스의 자식 클래스의 인스턴스를 만들면 부모의 추상 클래스의 인스턴스도 자동으로 만들어진다.
- 추상 클래스는 일반 필드, 일반 메서드, 생성자를 얼마든지 가질 수 있다.
- 추상 클래스의 자식 클래스는 반드시 부모의 추상 메서드를 오버라이딩하여 자신에 맞게 구현하도록 강제한다.
- 자식 클래스가 추상 클래스인 부모 클래스의 일부 메소드만 받아올 때 → 자식 클래스도 추상 클래스가 되어야 한다.
스타크래프트 예제
package chap07;

public abstract class Unit {
    int x, y;

    Unit(int x, int y) {
        this.x = x;
        this.y = y;
    }

    abstract void move(int x, int y);

    void stop() {
        System.out.println("현재 유닛이 멈춥니다.");
    }
}
package chap07;

public class Tank extends Unit {
    Tank(int x, int y) {
        super(x, y);
    }

    @Override
    void move(int x, int y) {
        System.out.println("탱크이 " + x + ", " + y + " 위치로 이동합니다.");
    }

    void changeMode() {
        System.out.println("공성모드로 변경!");
    }
}
package chap07;

public class Marine extends Unit {
    Marine(int x, int y) {
        super(x, y);
    }

    @Override
    void move(int x, int y) {
        System.out.println("마린이 " + x + ", " + y + " 위치로 이동합니다.");
    }

    void steampack() {
        System.out.println("마린이 미쳤어요!");
    }
}
package chap07;

public class Dropship extends Unit {
    Dropship(int x, int y) {
        super(x, y);
    }

    @Override
    void move(int x, int y) {
        System.out.println("드랍쉽이 " + x + ", " + y + " 위치로 이동합니다.");
    }

    void load() {
        System.out.println("드랍쉽이 병력을 태웁니다.");
    }

    void unload() {
        System.out.println("드랍쉽이 병력을 내립니다.");
    }
}
실행 코드
package chap07;

public class Ex20 {
    void play(Unit unit) {
//        unit.move(200, 200);

        if(unit instanceof Marine) {
            ((Marine)unit).move(unit.x, unit.y);
            ((Marine) unit).steampack();
        } else if (unit instanceof Tank) {
            ((Tank)unit).move(unit.x, unit.y);
            ((Tank)unit).changeMode();
        } else {
            ((Dropship)unit).move(unit.x, unit.y);
            ((Dropship)unit).load();
            ((Dropship)unit).unload();
        }
    }

    public static void main(String[] args) {
        Unit[] units = new Unit[4];

        units[0] = new Marine(10, 20);
        units[1] = new Tank(30, 40);
        units[2] = new Marine(20, 35);
        units[3] = new Dropship(60, 50);

        Ex20 ex20 = new Ex20();

        for(Unit unit: units) {
            ex20.play(unit);
        }
    }
}
마린이 10, 20 위치로 이동합니다.
마린이 미쳤어요!
탱크이 30, 40 위치로 이동합니다.
공성모드로 변경!
마린이 20, 35 위치로 이동합니다.
마린이 미쳤어요!
드랍쉽이 60, 50 위치로 이동합니다.
드랍쉽이 병력을 태웁니다.
드랍쉽이 병력을 내립니다.
4. 기본 키 매핑
기본키 매핑 어노테이션
- @Id(직접 할당)
- @GeneratedValue
@Id @GeneratedValue(strategy = GenerationType.AUTO)
 private Long id;
기본키 매핑 방법
1. 직접 할당: @Id만 사용
2. 자동 생성(@GeneratedValue)
1) IDENTITY: 데이터베이스에 위임, MYSQL
- Hibernate
Hibernate:

    create table Member (
       id varchar(255) generated by default as identity,
        name varchar(255) not null,
        primary key (id)
    )
- MySQL
Hibernate:

    create table Member (
       id varchar(255) not null auto_increment,
        name varchar(255) not null,
        primary key (id)
    ) engine=MyISAM
2) SEQUENCE: 데이터베이스 시퀀스 오브젝트 사용, ORACLE
private Long id;
Integer가 아닌 Long을 사용하는 이유 → Integer와 Long의 성능차이가 그리 크지 않지만 10억을 넘어갈 때 Integer를 Long으로 타입을 바꾸는 과정이 더 힘들다
Hibernate:
    call next value for hibernate_sequence
- SEQUENCE 전략 - 매핑
@Entity
@SequenceGenerator(name = "member_seq_generator", sequenceName = "member_seq")

public class Member {

    @Id
    @GeneratedValue(strategy = GenerationType.SEQUENCE, generator = "member_seq_generator")
Hibernate: create sequence member_seq start with 1 increment by 50
sequence가 member_seq로 나옴
3) TABLE: 키 생성용 테이블 사용, 모든 DB에서 사용. 키 생성 전용 테이블을 하나 만들어서 데이터베이스 시퀀스를 흉내내는 전략
- 장점: 모든 데이터베이스 사용 가능
- 단점: 성능
- @TableGenerator 필요
package hellojpa;

import javax.persistence.*;

@Entity
@TableGenerator(
        name = "MEMBER_SEQ_GENERATOR",
        table = "MY_SEQUENCES",
        pkColumnValue = "MEMBER_SEQ", allocationSize = 1)
public class Member {

    @Id
    @GeneratedValue(strategy = GenerationType.TABLE, generator =
            "MEMBER_SEQ_GENERATOR")
    private Long id;
Hibernate:

    create table MY_SEQUENCES (
       sequence_name varchar(255) not null,
        next_val bigint,
        primary key (sequence_name)
    )

4) AUTO: 방언에 따라 자동 지정, 기본값
권장하는 식별자 전략
- 기본 키 제약 조건
- null 아니어야 한다.
- 유일해야 한다.(유일성)
- 변하면 안된다.(불변성)
- 미래까지 이 조건을 만족하는 자연키는 찾기 어렵다. 대리키(대체키)를 사용하자.
- ex) 주민등록번호도 기본 키로 적절하지 않음.
- 권장: Long형(10억 넘어도 동작) + 대체키(시퀀스 등) + 키 생성전략 사용
IDENTITY 전략의 문제점
내가 ID 값을 직접 입력하면 안됨.
DB에서 NULL로 INSERT 값이 날라오면 그때 DB에서 값을 세팅한다.
DB에 INSERT를 해봐야 ID 값을 알 수 있다.
JPA에서 영속성 컨텍스트를 관리하려면 무조건 PK값이 있어야하는데 IDENTITY 전략은 DB에 들어가봐야 PK값을 알 수 있음.
영속 상태가 되었다는 건 영속성 컨텍스트 안의 1차 캐시에 있는 @Id가 DB PK값인데 IDENTITY는 DB에 넣기 전까지 이 값을 모름.
JPA 입장에서는 KEY가 없으니 값을 넣을 수 없음.
IDENTITY 전략에서만 예외적으로 em.persist()로 호출하는 시점에 바로 DB에 INSERT 쿼리를 날린다. (보통은 tx.commit() 시점에 날림)
package hellojpa;

import javax.persistence.*;

@Entity
public class Member {

    @Id
    @GeneratedValue(strategy = GenerationType.IDENTITY)
    private Long id;
tx.begin();
try {
Member member = new Member();
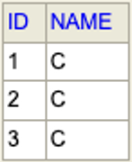
member.setUsername("C");
System.out.println("=================");
em.persist(member);
System.out.println("member.id = " + member.getId());
System.out.println("=================");
=================
Hibernate:
    /* insert hellojpa.Member
        */ insert
        into
            Member
            (id, name)
        values
            (null, ?)
member.id = 1
=================
→ 모아서 INSERT하는 것이 IDENTITY 전략에서는 불가능
SEQUENCE 전략의 특징
package hellojpa;

import javax.persistence.*;

@Entity
@SequenceGenerator(name = "MEMBER_SEQ_GENERATOR",
                   sequenceName = "MEMBER_SEQ", //매핑할 데이터베이스 시퀀스 이름
                   initialValue = 1, allocationSize = 1)
public class Member {
    @Id
    @GeneratedValue(strategy = GenerationType.SEQUENCE, generator =
            "MEMBER_SEQ_GENERATOR")
    private Long id;
Hibernate: create sequence MEMBER_SEQ start with 1 increment by 1=================
Hibernate:
call next value for MEMBER_SEQ
member.id = 1
=================시퀀스 전략: 1부터 시작하고 1씩 증가시키라고 세팅(옵션)
SEQUENCE object는 DB가 관리 → 이 전략도 DB에 가봐야 알 수 있다.
member 객체를 만들고 em.persist를 할 때 영속성 컨텍스트에 일단 들어가있어야 한다.
→ 그러면 항상 pk가 있어야함. → 먼저 sequence에서 pk를 가져와야 함.
→ MEMBER_SEQ에서 옆의 코드가 실행됨.
call next value for MEMBER_SEQ → DB에 다음 값을 달라고 하는 것.
1값을 얻어서 em.persist할 때 영속성 컨텍스트에 값을 넣으려 할 때
시퀀스 전략을 확인하고 DB에서 값을 얻어와서 멤버에 Id 값을 넣어준다.
아직 DB에 있었던 쿼리는 날라가지 않음. 실제 transaction을 commit하는 시점에 날라감.(버퍼 가능)
allocationSize
- 사용 이유: 저장할 때마다 call next value가 나온다면 성능 저하 우려 → allocationSize에 설정한 값만큼 미리 땡겨 오는 것
- 기본값 = 50
- 이런 방식에서 미리 올려놓고 메모리에서 그 개수만큼 사용하는 것
- 여러 웹 서버가 있어도 동시성 이슈없이 다양한 문제들이 해결이 됨.
Member member1 = new Member();
            member1.setUsername("A");
            Member member2 = new Member();
            member1.setUsername("B");
            Member member3 = new Member();
            member1.setUsername("C");

            System.out.println("=================");
//            em.persist(member);
            System.out.println("member1 = " + member1.getId());
            System.out.println("member2 = " + member2.getId());
            System.out.println("member3 = " + member3.getId());
            System.out.println("=================");
@SequenceGenerator(name = "MEMBER_SEQ_GENERATOR",
                   sequenceName = "MEMBER_SEQ", //매핑할 데이터베이스 시퀀스 이름
                   initialValue = 1, allocationSize = 50)


현재값이 -49고 증가가 50인 이유: 보통 call next value해서 나온 값을 사용하는데 그 값이 1이 되기를 기대하는 것
call next value for MEMBER_SEQ; 를 입력하여 현재 값을 1로 세팅
Member member1 = new Member();
            member1.setUsername("A");

            Member member2 = new Member();
            member2.setUsername("B");

            Member member3 = new Member();
            member3.setUsername("C");

            // 처음 호출 DB SEQ = 1     |   1
            // 두번 호출 DB SEQ = 51    |   2
            // 두번 호출 DB SEQ = 51    |   3

            System.out.println("=================");
            em.persist(member1); // 1, 51
            em.persist(member2); // MEM
            em.persist(member3); // MEM
            System.out.println("member1 = " + member1.getId());
            System.out.println("member2 = " + member2.getId());
            System.out.println("member3 = " + member3.getId());
            System.out.println("=================");
=================
Hibernate:
    call next value for MEMBER_SEQ
Hibernate:
    call next value for MEMBER_SEQ
member1 = 1
member2 = 2
member3 = 3
=================
첫번째 호출 때 50까지 확보하고 두번째 호출 때 100까지 확보
@TableGenerator의 allocationSize도 똑같은 전략
미리 값을 올려두는 방식이기 때문에 웹서버 여러 대가 동시에 호출하더라도 각각 숫자를 확보하고 있기 때문에 문제는 발생하지 않음.
'TIL' 카테고리의 다른 글
| [TIL-6 / 230621] JPA 다양한 연관관계 매핑 (0) | 2023.06.21 |
|---|---|
| [TIL-5 / 230620] JPA 연관관계 매핑 기초, 연관관계의 주인 (0) | 2023.06.20 |
| [TIL-4 / 230618] Java - 인터페이스 (0) | 2023.06.19 |
| [TIL-2 / 230613] Java의 제어자, JPA 엔티티 매핑 (0) | 2023.06.13 |
| [TIL-1 / 230612] JPA 영속성 컨텍스트 (0) | 2023.06.12 |