반응형

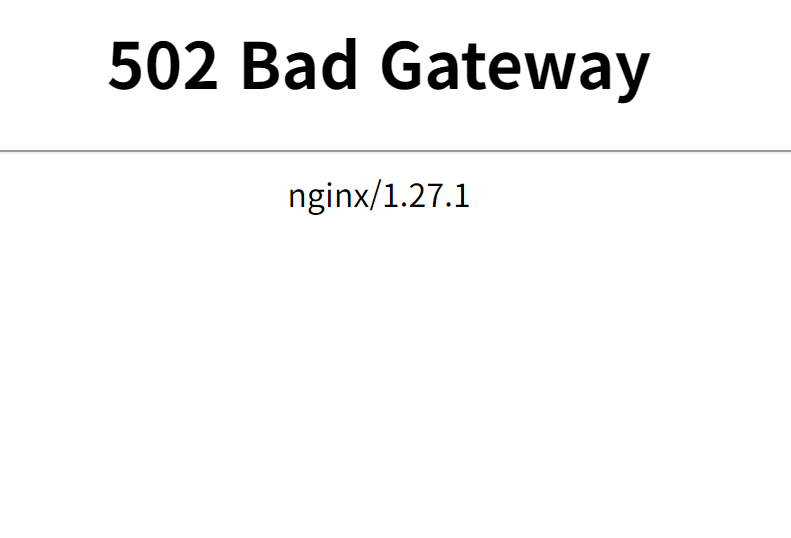
elk 환경을 구성하면서 .env 파일을 작성하고 docker-compose.yml을 통해서 elasticsearch가 제대로 동작하는 것을 확인하였고 kibana를 확인하는데 502 에러가 발생해서 로그를 살펴보니 아래와 같은 에러가 발생했다.
<shell />FATAL Error: [config validation of [elasticsearch].username]: value of "elastic" is forbidden. This is a superuser account that cannot write to system indices that Kibana needs to function. Use a service account token instead. Learn more: https://www.elastic.co/guide/en/elasticsearch/reference/8.0/service-accounts.html
이것을 해결하는 과정을 담아보겠다.
우선 elasticsearch 컨테이너에 들어가서 아래 명령어를 통해 토큰을 발급받는다.
<shell />bin/elasticsearch-service-tokens create elastic/kibana kibana_system
그럼 아래처럼 토큰을 생성해준다. 생성된 토큰은 따로 저장해두자.
<shell />Created service token elastic/kibana/kibana_system with token: [서비스 토큰]
생성한 토큰은 .env에 저장하여 docker-compose.yml을 실행할 때 환경변수로 사용한다.
      <shell />


      # .env 파일
ELASTICSEARCH_SERVICE_TOKEN=[서비스 토큰]
그리고 kibana에서도 생성한다. 생성하는 명령어는 아래와 같다.
<shell />bin/kibana-encryption-keys generate
그러면 아래와 같이 키가 발급된다.
      <shell />


      ## Kibana Encryption Key Generation Utility

The 'generate' command guides you through the process of setting encryption keys for:

xpack.encryptedSavedObjects.encryptionKey
    Used to encrypt stored objects such as dashboards and visualizations
    https://www.elastic.co/guide/en/kibana/current/xpack-security-secure-saved-objects.html#xpack-security-secure-saved-objects

xpack.reporting.encryptionKey
    Used to encrypt saved reports
    https://www.elastic.co/guide/en/kibana/current/reporting-settings-kb.html#general-reporting-settings

xpack.security.encryptionKey
    Used to encrypt session information
    https://www.elastic.co/guide/en/kibana/current/security-settings-kb.html#security-session-and-cookie-settings


Already defined settings are ignored and can be regenerated using the --force flag.  Check the documentation links for instructions on how to rotate encryption keys.
Definitions should be set in the kibana.yml used configure Kibana.

Settings:
xpack.encryptedSavedObjects.encryptionKey: [encryptedSavedObjects.encryptionKey]
xpack.reporting.encryptionKey: [reporting.encryptionKey]
xpack.security.encryptionKey: [security.encryptionKey]
발급된 키를 이제 kibana.yml에 적용시키자.
      <shell />


      server.name: kibana
server.port: 5601
server.host: "0.0.0.0"
#리버스 프록시를 위한 기본 경로
server.basePath: "/kibana"
server.rewriteBasePath: true

elasticsearch.hosts: [ "http://elasticsearch:9200" ]
elasticsearch.serviceAccountToken: [서비스 토큰]

monitoring.ui.container.elasticsearch.enabled: true
monitoring.ui.container.logstash.enabled: true

xpack.security.encryptionKey: "[security.encryptionKey]"
xpack.encryptedSavedObjects.encryptionKey: "[encryptedSavedObjects.encryptionKey]"
xpack.reporting.encryptionKey: "[reporting.encryptionKey]"

# Fleet 설정
xpack.fleet.enabled: true
xpack.fleet.outputs:
  - id: fleet-default-output
    name: default
    type: elasticsearch
    hosts: [ "http://elasticsearch:9200" ]
이렇게 적용시켰다면 이제 거의 완료되었다. 적용된 키들을 바탕으로 docker-compose.yml 설정을 변경해주자.
      <shell />


      version: '3'
services:
  setup:
    profiles:
      - setup
    build:
      context: setup/
      args:
        ELASTIC_VERSION: ${ELASTIC_VERSION}
    init: true
    volumes:
      - ./setup/entrypoint.sh:/entrypoint.sh:ro,Z
      - ./setup/lib.sh:/lib.sh:ro,Z
      - ./setup/roles:/roles:ro,Z
    networks:
      - ${NETWORK_NAME}
    depends_on:
      - elasticsearch
      - kibana
      - logstash

  # Elasticsearch 관련 서비스
  elasticsearch:
    image: docker.elastic.co/elasticsearch/elasticsearch:${ELASTIC_VERSION}
    container_name: elasticsearch
    environment:
      TZ: ${TZ}
      discovery.type: single-node
      ES_JAVA_OPTS: '-Xms512m -Xmx512m'
    volumes:
      - /home/ubuntu/elasticsearch/config/elasticsearch.yml:/usr/share/elasticsearch/config/elasticsearch.yml
      - /home/ubuntu/elasticsearch_data:/usr/share/elasticsearch/data
    networks:
      - ${NETWORK_NAME}
    restart: unless-stopped
    ports:
      - "${ELASTICSEARCH_PORT_9200}:9200"
      - "${ELASTICSEARCH_PORT_9300}:9300"

  kibana:
    image: docker.elastic.co/kibana/kibana:${ELASTIC_VERSION}
    container_name: kibana
    environment:
      TZ: ${TZ}
      ELASTICSEARCH_HOSTS: http://elasticsearch:${ELASTICSEARCH_PORT_9200}
      ELASTICSEARCH_SERVICE_TOKEN: ${ELASTICSEARCH_SERVICE_TOKEN}
      NODE_OPTIONS: "--no-openssl-legacy-provider"
    volumes:
      - /home/ubuntu/kibana/config/kibana.yml:/usr/share/kibana/config/kibana.yml
    networks:
      - ${NETWORK_NAME}
    restart: unless-stopped

  logstash:
    image: docker.elastic.co/logstash/logstash:${ELASTIC_VERSION}
    container_name: logstash
    environment:
      TZ: ${TZ}
    volumes:
      - /home/ubuntu/logstash/config/logstash.yml:/usr/share/logstash/config/logstash.yml
    networks:
      - ${NETWORK_NAME}
    restart: unless-stopped
    ports:
      - "${LOGSTASH_PORT}:5044"

networks:
  ubuntu_default:
    external: true

volumes:
  elasticsearch_data:
elk 관련 내용만 담았다. 위 소스코드처럼 ELASTICSEARCH_SERVICE_TOKEN을 kibana에 적용시키면 된다.
적용을 완료했다면 아래 명령어로 docker-compose를 restart 해주자.
<shell />docker-compose restart elasticsearch kibana
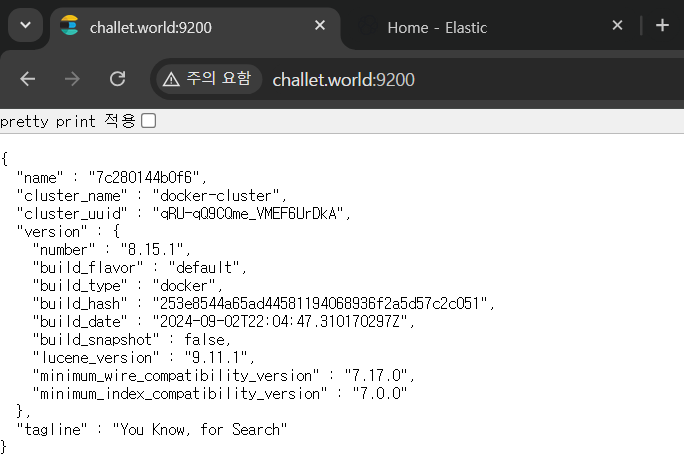
그러면 elasticsearch 컨테이너와 kibana 컨테이너가 다시 생성되고 아래처럼 제대로 동작하는 것을 확인할 수 있다.

반응형
'Error' 카테고리의 다른 글
| [Error] Gradle build daemon disappeared unexpectedly (1) | 2024.09.24 |
|---|---|
| Jenkins 플러그인 설치 오류 (1) | 2024.09.23 |
| [Spring Security] SecurityContextHolder에서 로그인 정보를 잃어버렸다 (0) | 2024.06.21 |
| [MySQL] DAO와 MySQL 연동 에러(Mac, Intellij) (0) | 2023.09.14 |
| [colima] FATA[0600] error starting vm: error at 'starting': exit status 1 (0) | 2023.09.02 |